7UR7L3 learns AppSec: Bad Apps Series
Since passing the eJPT exam at the end of January, I have been learning about application security from a combination of Tanya Janca’s book, “Alice and Bob learn Application Security”, various blogs, and hands-on-practice in my home lab. I highly recommend the book for anyone interested in application security / incorporating security early in the system development lifecycle (SDLC). The topic of one of the last chapters of the book is how to continue learning / practicing application security. Given my background in software development, I decided to make one or more applications where I can play around with some application security concepts.
Bad Apps: Blog is the first app in a series of “Bad Apps”, which will be implemented insecurely by design, and I will explore how to fix / mitigate the vulnerabilities. The goal is to learn what the vulnerabilities look like in code, practice a little threat modelling, and write some security fixes / mitigations. I also want to get some exposure to frameworks and languages that I don’t use very often; however, to start out, I will stick with Python, a language that I know very well from my job as a computational physicist.
Threat Modeling
Threat modelling is an important step in securing an application. Based on “Alice and Bob learn Application Security”, threat modelling is the process of defining all threats to your application / organization. It helps to guide how to prioritize effort and resources when securing applications.
To practice a little threat modelling, I’m using an imaginary company, Bad Apps Inc., as the product owner. Bad Apps Inc. is a startup that is launching a micro-blogging platform where registered users can share short blog posts. Bad Apps Inc. acts as a publisher, and will monetize the app by publishing ads so it is important that many people view the blog. The bottom line is that Bad Apps Inc. needs the following to be profitable:
- Bloggers writing interesting posts on the platform
- Viewers that keep coming back to read posts
I began threat modelling by asking what a threat actor would want to target in the app / organization. After some brainstorming, I came up with a few plausible targets:
- The content itself : a threat actor may want to perform a denial of service (DoS) attack, or deface the application or posts that contain content that they disagree with. This has historically been a common target of Hacktivist groups, or other nonstate threat actors that choose to participate in cyberwarfare operations. This can lead to lost ad revenue, at least while the application content is unavailable.
- The viewers : if the Bad Apps: Blog isn’t properly secured, it could be used as a platform to attack the viewers, for example, via a cross-site request forgery (CSRF) attack against their accounts for other websites / applications. If Bad Apps: Blog has a reputation for visitors being hit with malicious payloads, then no one will use it and Bad Apps Inc. will loose its revenue stream.
- The bloggers : A threat actor may be interested in damaging the reputation of a specific blogger on the platform by posting embarrassing content through their account, or using an account meant to spoof the author’s name. For example, if ‘Bob’ is a blogger on the platform, and Alice wants to embarrass him, then Alice may make an account called ‘B0b’ and write an off-putting post. Bob may be unhappy with this and take his posts elsewhere.
In addition to the targets above, we have all the common threats that any organization faces like ransomware, and people that just want to cause some damage. We’ll focus on just the threats in the list above since Bad Apps Inc. is fictional.
Flask (Python) – Bad Apps: Blog
While I have more than 7 years of experience with Python, I’m new to writing web apps. For the first app in the Bad Apps series, I went through Flask’s official tutorial to learn the framework. The tutorial guides you through writing a simple blog application with simple user management / authentication, etc. You can find the tutorial here. It’s worth going through it yourself if you also want to follow along with this project. I started out with essentially an exact copy of the tutorial app. The Flask tutorial challenges learners to implement several different features in the blog app. I plan on implementing some of these, especially ones that could introduce a security problem if not handled correctly.
You can find Bad Apps: Blog on GitHub. Feel free to fork it, and/or make pull requests if you do something fun with it! I even made a Dockerfile/Containerfile if you just want to build it and try to break it in your home lab. I’ll keep most of the history in GitHub, but I’ll summarize a few things that I did here.
Some Notes on Flask Security
It’s always important to consider the security of any frameworks, or third-party software components that are in your application. Flask’s documentation includes a security guide. One of the main security focuses within Flask is to prevent cross-site script (XSS) vulnerabilities. For the most part, Flask should prevent XSS vulnerabilities as long as you use Jinja2 templates (where Flask escapes all output) to generate all html, and follow a few other guidelines in the official guide. Here is an example of a simple Flask app that demonstrates what the security guide tells you NOT to do:
import base64

from flask import Flask
from markupsafe import escape

app = Flask(__name__)

@app.route("/bad/<name>")
def hello_bad(name):
    return f"<p>Hello, {base64.b64decode(name).decode('utf-8')}!</p>"

@app.route("/okay/<name>")
def hello_okay(name):
    return f"<p>Hello, {escape(base64.b64decode(name))}!</p>"
I used base64 encoding because directly sending a standard XSS payload via the URL didn’t work (neither did URL encoding, or double URL encoding it!). It’s probably possible to perform a reflected XSS attack without the base64 encoding, this just helped to make the demo a bit simpler. If we base64 encode <script>alert("XSS!")</script>, and navigate to the /bad/<payload here> endpoint, the payload will trigger. If we send it to the /okay/<payload here> endpoint, we just see a simple html document that prints the XSS payload as code. You can give this a try yourself! I labelled the second endpoint as ‘okay’, not ‘good’, because it is still best to use a Jinja2 template but at least the output was escaped.
As a side note, I’ve been told in conversations that it can be difficult to perform “Static Application Security Testing” (SAST), that is, security tests which do not run any code, in some cases. Two challenges are the very large volume of code that is produced in many organizations, and the fact that making a good pattern that accurately detects a specific vulnerability can be difficult. There are some fancy SAST tools / scanners out there, but I thought about how I might find this specific misuse of Flask with just regular expressions (regex). The XSS vulnerability above can be easily found using the Linux command line tool ‘grep’ like this:
grep -rE "<(.*)>.*{.*}.*</\1>" ./ | grep -v escape
The regex tries to match any string that looks like an html tag and has a “format” field where a variable may be written. The second ‘grep’ command excludes any matches that contain the escape function. It’s not the most elegant way to detect the XSS vulnerability that was introduced, but it is a start. It also won’t catch any strings that are missing either the beginning, or end of an html tag (for example, if the html is generated across multiple strings). The commands above should be pretty fast, even with the pipe. Give it a try!
A known security vulnerability in Flask is that it does not include form validation so that that apps using Flask are typically vulnerable to cross-site request forgery (CSRF). This is known and documented in the Flask security guide. We will come back to this in a future post! For now, let’s move on to specific security issues with Bad Apps: Blog.
Initial Security Updates
The purpose of the Flask tutorial is to give an intro to Flask, not to produce a secure web application. Before adding new features, I started with some initial security updates to the application. The focus is on defending the application content and blogger user accounts. I tested the app for XSS vulnerabilities, but didn’t find any. For now, visitors to the app should be safe, even if a blogger makes a post that intentionally contains a malicious script. I’ll briefly go over what Issues I immediately saw, how they fit into the threat model, and how I fixed them.
No Logging
Insufficient logging moved up one spot (from 10 to 9) on the OWASP Top 10 list when the 2021 version was released. The problem with no logging, or insufficient logging, is that attacks against the app can’t be detected or responded to effectively. The underlying development server that the framework uses logs which HTTP requests are made along with some other data. The app needs to log important actions that take place within itself that the framework doesn’t see. We also want to take more control over how logging is performed. I added logging throughout the app using Python’s logging module. It’s very easy to use, and you can easily set the ‘level’ of a specific message (Info, warning, error, etc.) by calling a different function. In practice, you should replace print('stuff') with one of the following.
logging.info('The app did something normal that you may want to know about')
logging.warning("something's not quite right. Here is relevant information")
logging.error('The app had a problem!!')
You will also need to set the logging level of the app. Setting the logging level allows you to control which messages are sent to the log. For example, if we set the logging level to ‘debug’, we will get debug messages and all messages that exist at a lower level (info, warning, etc.). You can set this with the following code.
logging.basicConfig(level=logging.INFO)
I also added a tag to any log messages that are specifically intended for security sake so that they can be easily found in logs at a latter time. I’m barely scratching the surface of the logging module. It’s very flexible and powerful. Check the official documentation for more.
Hard-coded Secret
Flask uses a secret called SECRET_KEY as part of it’s session management engine. It is important that any potential attackers do not know this key since it would help them to attack both the content of the app, and/or any specific blogger accounts. Part of the initial code looked something like this:
def create_app(test_config=None):
    # create and configure the app
    app = Flask(__name__, instance_relative_config=True)
    app.config.from_mapping(
        SECRET_KEY='dev',
        DATABASE=os.path.join(app.instance_path, 'bad_apps_blog.sqlite'),
    )

    if test_config is None:
        # load the instance config, if it exists, when not testing
        app.config.from_pyfile('config.py', silent=True)
    else:
        # load the test config if passed in
        app.config.from_mapping(test_config)
The initial implementation has a hard coded key that is intended for development purposes (i.e to ensure consistent behavior). Any test/production instance of the app should have a different SECRET_KEY set. It would be better if a hard-coded key were not used at all. Also, the DATABASE value is sometimes a secret as well for a production instance since it may contain database credentials. That’s not an issue for the development build though which uses a simple SQLite database.
As a fix, I removed the hard-coded key, and added a simple command line tool that generates a configuration file for the app instance. In this case, there is no specific need for the development key to be the same for all developers. The SECRET_KEY should only effect the signature that is added to the cookies. It is only important that it is set to something, otherwise, Flask won’t allow any user sessions to be created. You can see what I did in the app on GitHub. With the changes, a developer only needs to run the following command once, and the configuration file will be saved for future use.
$ flask init-config
This is similar to what developers need to do to setup a development instance of the database as well so it fits into the existing workflow.
Verbose Error Messages
The initial version had verbose errors when a login fails. Specifically, it reveals whether the username, or the password was wrong if a login fails. If both are wrong, then it would default to saying that the username is wrong. In the image below, the username and password were incorrect. The error message “Incorrect password.” is displayed if the Username is correct, but the password is wrong.
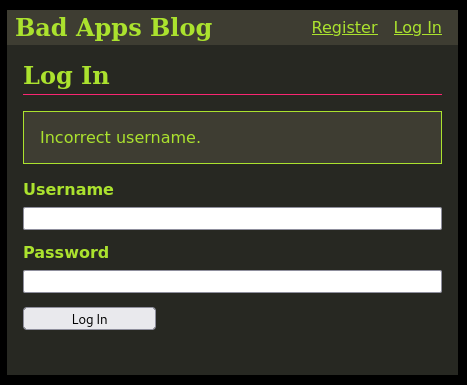
This makes it easy to enumerate usernames. An attacker can easily automate the process of enumeration using a script that attempts to log in with usernames from a wordlist along with a random (probably) incorrect password. They can then use the error messages to determine if the username is valid or not. There are plenty of tools out there that can do this automatically.
Dictionary attacks against passwords are feasible since the username is known. For each known valid username, the attacker only needs to try different passwords. This attack is easily performed with common tools like hydra.
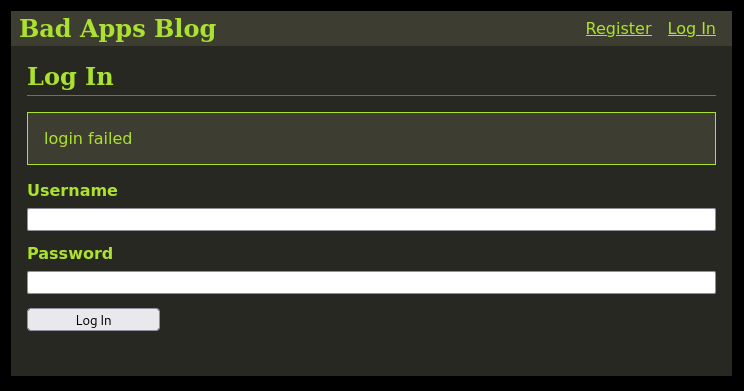
If we use a generic error message instead, ‘login failed’ for example, then a dictionary-based attack has to guess both the username and the password correctly. The attacker has no way to know if either is correct so they would need to try all pairs of usernames and passwords. Complexity-wise, this is an O(N2) attack, while enumerating users via a verbose error message, then brute forcing the passwords for known valid usernames has only O(N) complexity (one linear-scaling attack followed by another linear scaling attack).
I fixed this by simply using a generic error message for logins (which is a common solution to this problem). The image below shows a generic login error message.
Usernames are disclosed within blog posts
Implementing generic error messages to prevent username enumeration is irrelevant if usernames can be found some other way. In the initial version of Bad Apps: Blog, the username is tied directly to each post, just like in the image below which shows the Title of a post by the user “B@dApPz”.
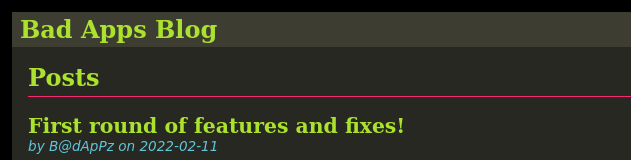
This gives potential threat actors at least two pieces of information. First, it reveals the username. Second, it ties the specific post to a specific username. If the threat actor wants to modify / remove that post, they know exactly which account to attack.
We can fix this by allowing bloggers to use a display name in the author field instead of their user account name. We have to be careful though! This could also allow a malicious blogger to register for an account using a misleading display name. For example, using an existing author’s name as their own display name. We need to make sure that the display name of new accounts is not the same as either an existing username, or display name.
Ideally, we want to prevent a threat actor from enumerating users via registration error messages. However, in practice, attempting to enumerate usernames by registering for accounts is very loud since most attempts to register with a username / display name combination will be successful. Probably, all of these will use the same password as well, depending on what tool/script is used. The database will quickly grow in size and, cross referencing the logs, it will be clear that someone was trying to enumerate users in this way. Also, we may annoy potential legitimate users if they don’t know why they are unable to register. We will accept the risk of username enumeration in this case since there is a specific business need (i.e. to not annoy / deter new legitimate users).
Implementing the display name was straight-forward. You can look at the code on GitHub if you are interested. One thing to keep in mind is that the display name is considered public. It’s not a credential, it’s just an alias that hides the username credential. It’s still important to validate the requested display name. For example, it can’t match an existing display name, and it can’t match an existing username. We can enforce the first condition at the database level. See the SQL schema below:
CREATE TABLE user (
  id INTEGER PRIMARY KEY AUTOINCREMENT,
  username TEXT UNIQUE NOT NULL,
  displayname TEXT UNIQUE NOT NULL,
  password TEXT NOT NULL
);
Here, both the username and displayname are ‘UNIQUE’. If we try to INSERT a value that is already present, we will get a database error. Technically, we should probably also convert all input characters to Latin alphabet characters; otherwise, someone could use a character from a different alphabet that looks like a Latin letter. This is commonly done for fake/malicious links, but could be done here too.
We also need to check that a requested display name is not a current username either. We can check it against the database as seen below.
# Need to validate that the requested displayname is not an existing username
user = db.execute(
    'SELECT * FROM user WHERE username = ?', (displayname,)
).fetchone()

if user is not None:
    error = f"Display name {displayname} is currently in use."
    logging.warning(f'User registration failed : Reason : attempted to register an existing username ({user["username"]}) as display name')
Note that the string in error will be displayed to users, but the message in logging.warning, which contains more specific information, is only sent to our own logs. I also used the same error message for an invalid display name whether it is invalid because it is a username, or invalid because it is actually an existing display name. This is to prevent a threat actor from enumerating users by first creating a regular account, then attempting to register again with their same username, but changing the display name. This would be quieter than registering many accounts, since the database will only get one additional user account, but it would still be obvious in the logs.
What’s Next?
I had a lot of fun getting started on this project. This was just a taste of what I’ve done with Bad Apps: Blog so far. I played around with container security a little bit, and tested it for CSRF vulnerabilities (yes, it is vulnerable just like any Flask app that hasn’t specifically addressed this). I’ve already made some fixes to prevent CSRF attacks against the app which are on GitHub. That was a lot of fun, so I plan to talk about that in a future post. There are a few other vulnerabilities that I want to test for as well, but I may move on to a different “Bad App” soon so that I can look at completely different security concerns.